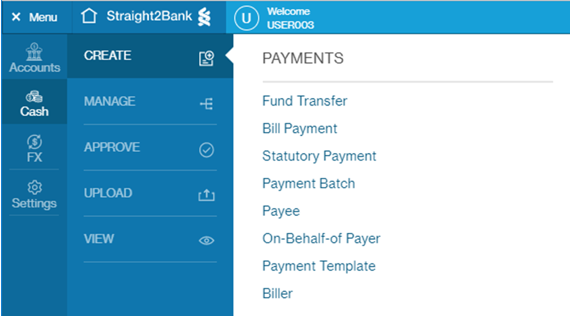
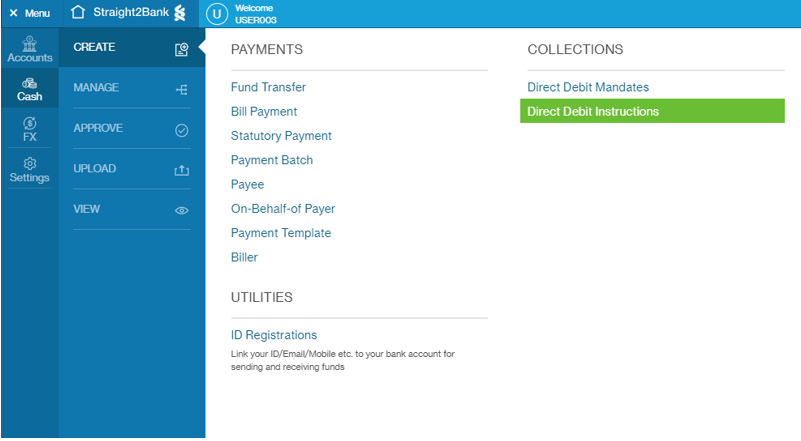
- FPS Payments
- FPS Collections
- FPS Proxy ID Registration
- FPS FAQ
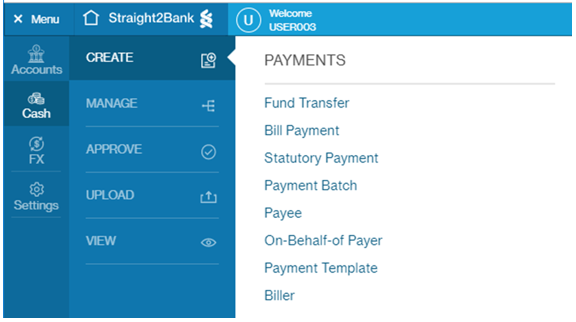
Create Payee
Step 1: Select Menu -> Cash -> Create -> Payee
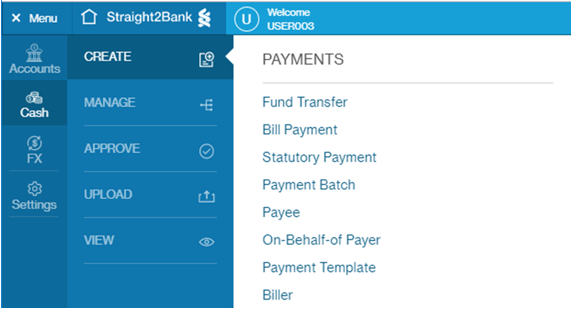
Step 2: Enter all mandatory information i.e. Payee Nickname, Country/Market, Payee Name and Payee Residence Country/Market.

Step 3: Fill in other optional items if necessary (including Address, Zip Code, Notes to Payee and other contact details)
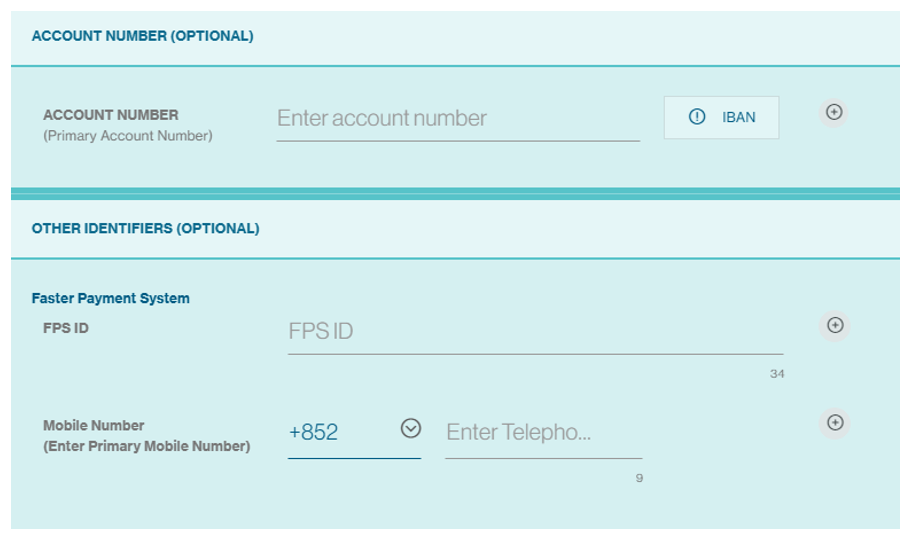
Step 4: Enter the account number for Pay to Account; for Pay to Proxy, enter FPS ID or Mobile Number instead.
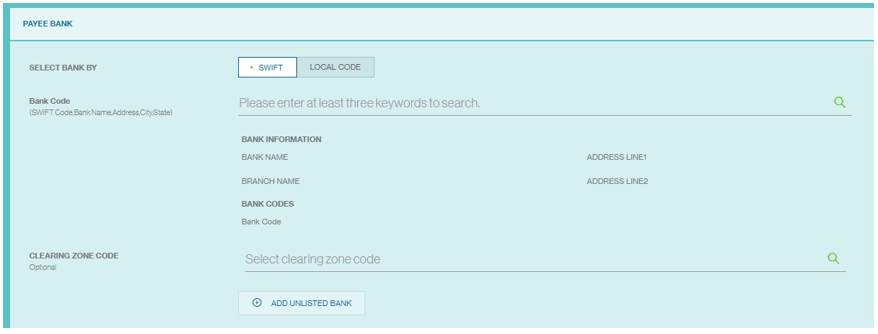
Step 5: Fill in payee bank and intermediary bank as required
Step 6: Click “Continue” or” Save” to save as draft

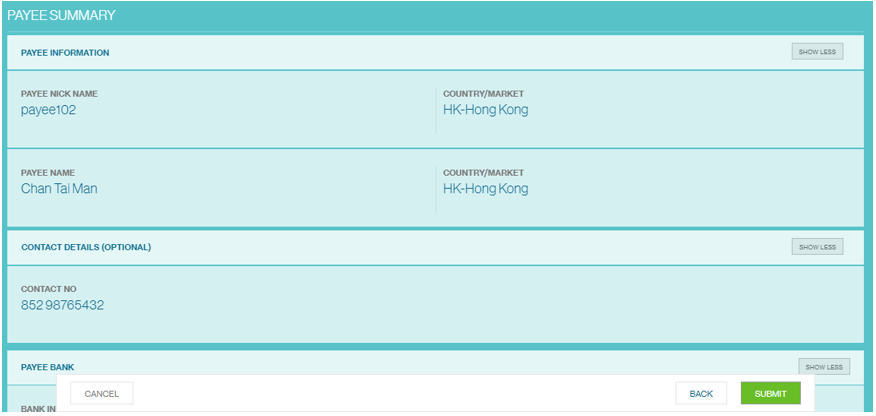
Step 7: Review and click “Submit”

Step 8: Payee created and submitted for approval

Step 9: Click “Manage Payee” to review all other payees
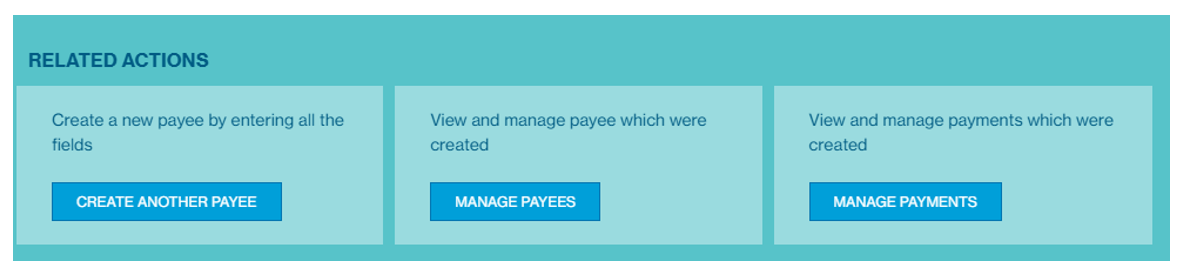
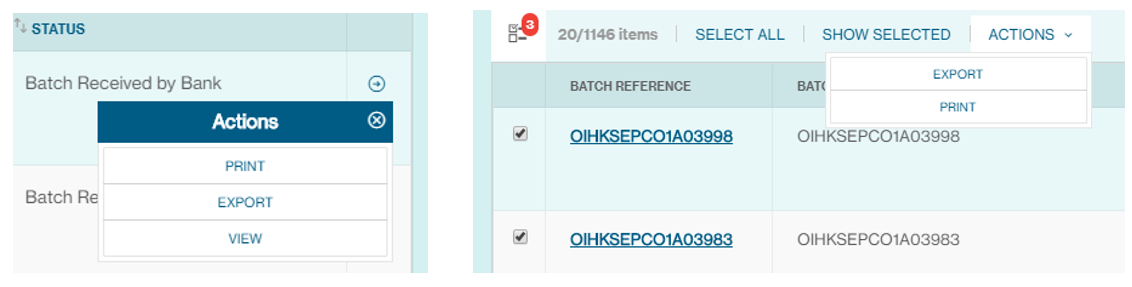
Step 10: Click the button
![]() to take required actions on the payee
to take required actions on the payee
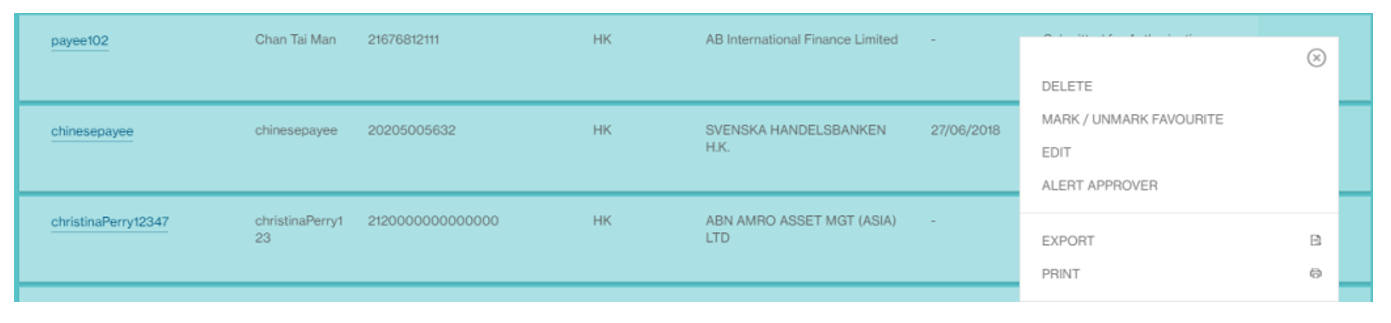
| List of possible actions | |
|---|---|
| Print the records which are selected in pdf | |
| EXPORT | Export the list in xls/csv/pdf format |
| VIEW | Click on the Payee Name for details |
| DELETE | Delete the payment batch |
| EDIT | Edit the payment batch |
| ALERT APPROVER | Alert approver as a notification |
| MARK/ UNMARK FAVOURATE | Payee would be starred  |
| INITIATE PAYMENT | Only for approved payee |
Payment Initiation
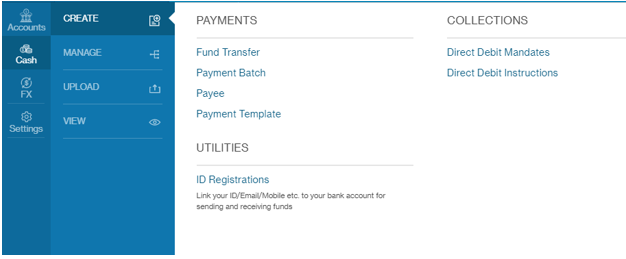
Step 1: Select Menu -> Cash -> Create -> Fund Transfer
Step 2: Enter payment reference. This is defaulted to a system-generated unique transaction reference, but client can provide their own reference. This needs to be unique within the client group.

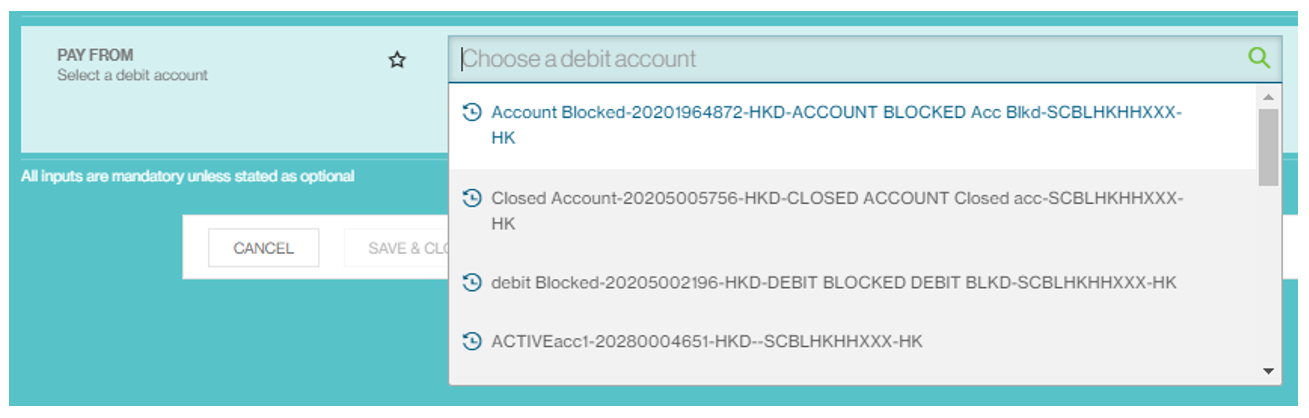
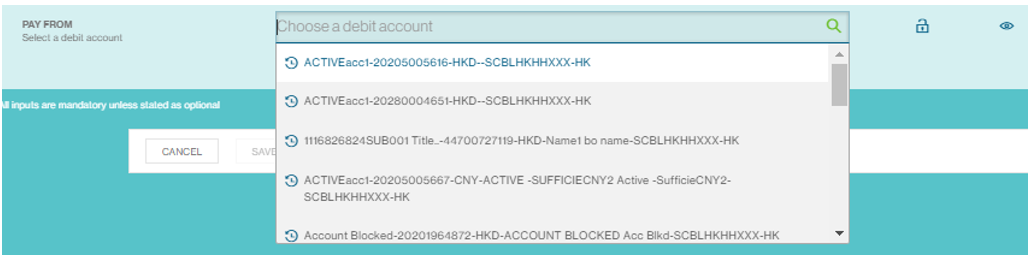
Step 3: Search and select the debit account
Tip: Type at least 3 characters – account number, currency, account name or bank code – to search.
Step 4: Select the appropriate payment method

Step 5: For previously used payee, search and select. For new payee, please click “Create Payee” and refer to Create Payee instructions from the navigation menu on the left side of this page

Step 6: Enter payment amount. Payment threshold per FPS transaction is capped at HKD or RMB 1 million

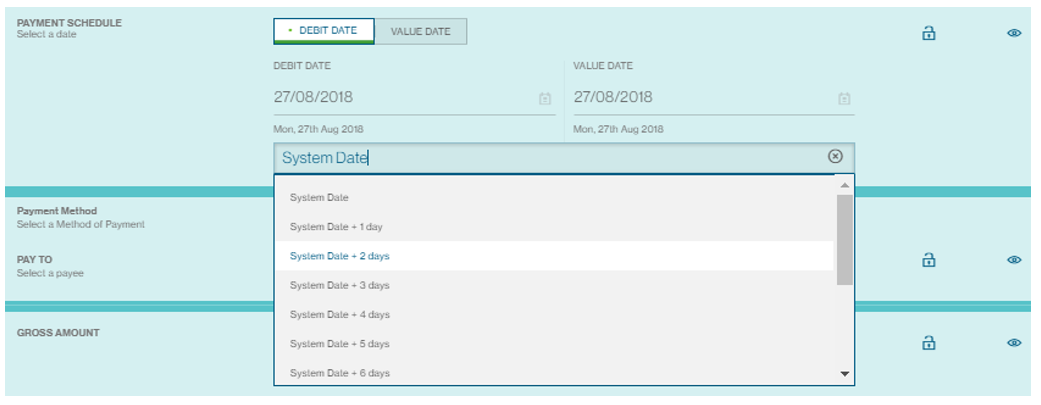
Step 7: Choose payment schedule either by debit date or value date.
Tip: if value date is chosen, the debit date cannot be amended

Step 8: Select IBFT to initiate FPS payments

Step 9: This function is not applicable. Regardless of setting, payer will be charged a fee and payee will not bear any charges.

Step 10a: Click “Continue” to initiate payment. System will display relevant error message if any error is detected in the form

Step 10b: “Save as template” will redirect user to the Create Template module. Please refer to instructions for Create Payment Template from the navigation menu on the left side of this page

Creating Payment Template
Step 1: Select Menu -> Cash -> Create -> Payment Template
Step 2: Input template nickname. This is defaulted to a system-generated unique nickname, but client can provide their own nickname. This needs to be unique within the client group.

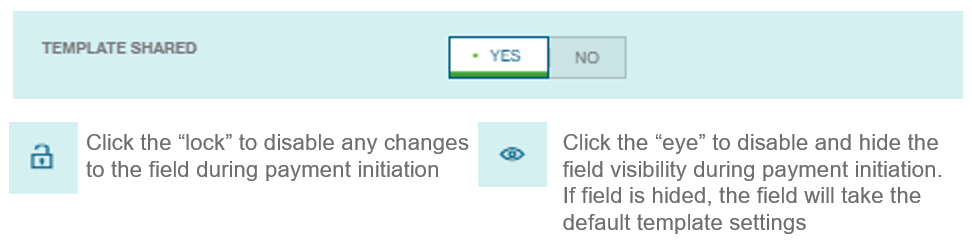
Step 3: Indicate template shared
Step 4: Search and select debit account
Step 5: Select IBFT to create FPS payments template

Step 6: Choose payment schedule either by debit date or value date. Tip: the actual date option is disabled in the template form, choose from the drop down menu
Step 7: Select appropriate payment method

Step 8: Select created payee; refer to instructions for Create Payee from the navigation menu on the left side of this page. (Tip: Payee cannot be locked or hidden)

Step 9: Enter payment amount. Payment threshold per FPS transaction is capped at HKD and RMB 1 million (Tip: Amount cannot be locked or hidden)

Step 10: This function is not applicable. Regardless of setting, payer will be charged a fee and payee will not bear any charges.

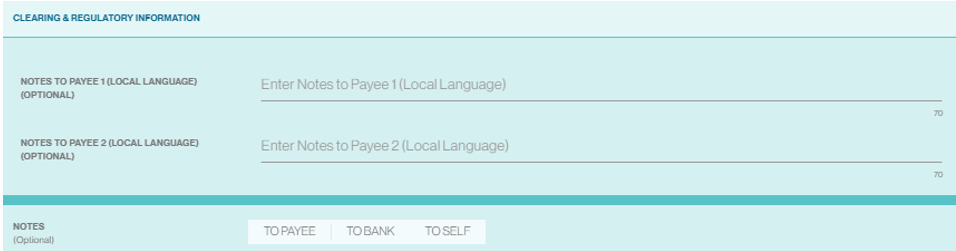
Step 11: Add additional information as required
Step 12: Click “Confirm” to proceed or “Save & Close” to save as draft

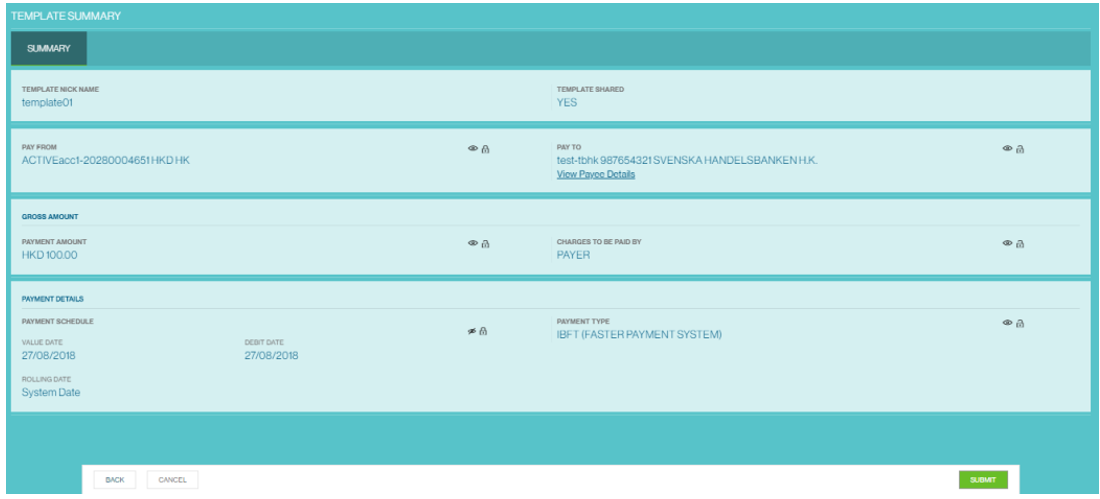
Step 13: Double check template summary and click “Submit” to submit the template for approval or click “Back” to make amendments
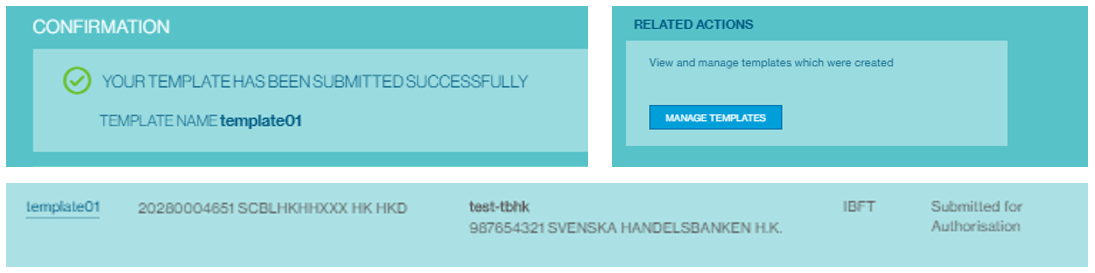
Step 14: Template submitted for approval depending on the approval set up and can be viewed under “Manage templates”
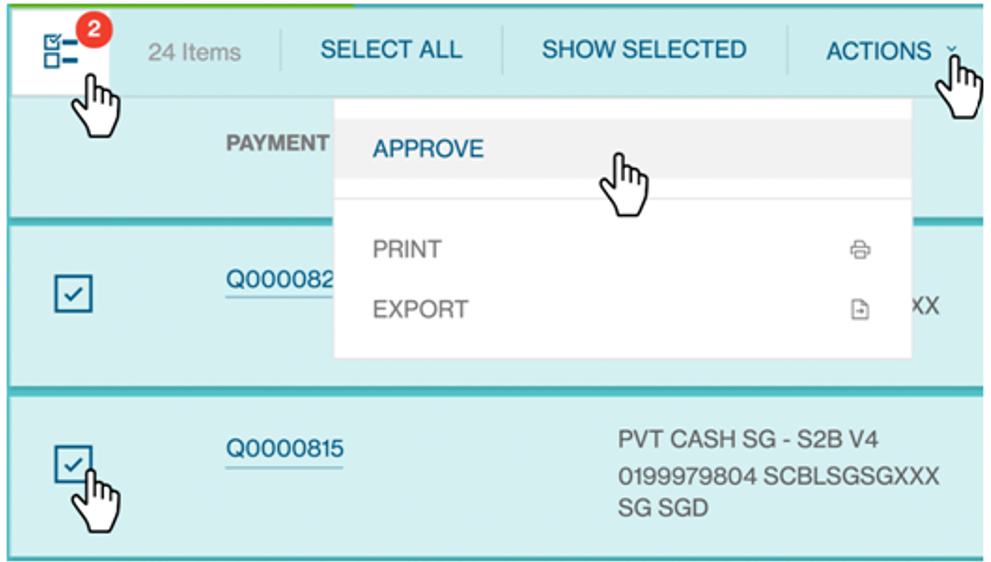
Payments Approvals
Step 1a: Select Menu -> Cash -> Approve -> Transactions
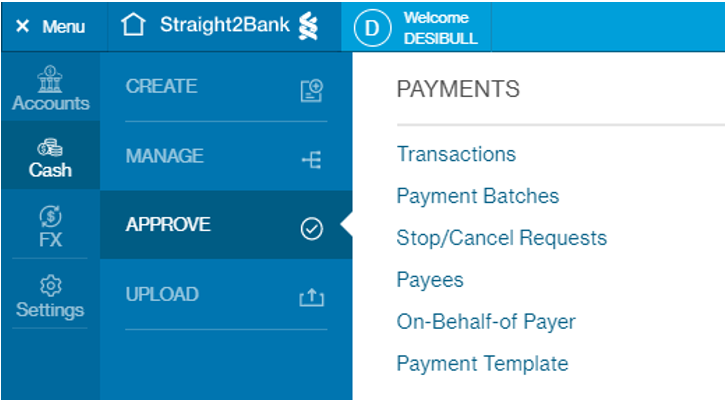
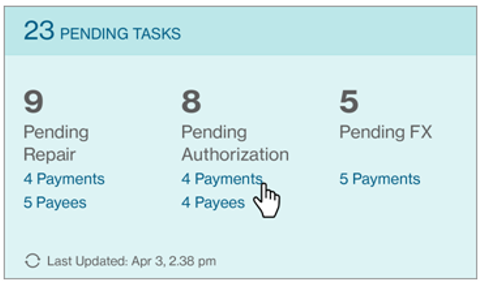
Step 1b: Or from the Dashboard, click “Payments” under Pending Authorization
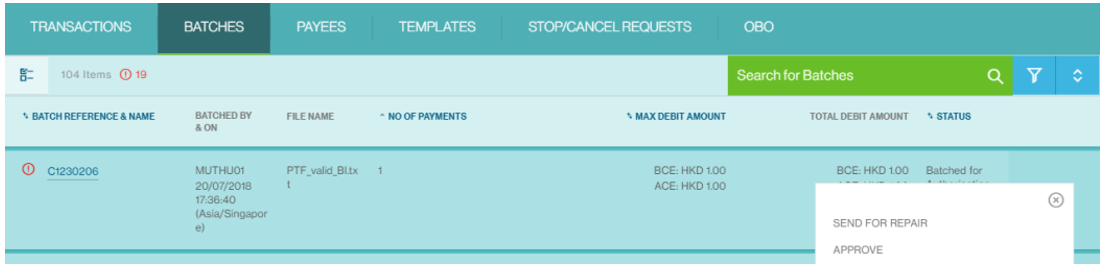
Step 2: To approve a payment batch/transaction, click the button
![]() and click “Approve”. The
and click “Approve”. The
 alert indicates the number of priority items pending the approver’s action
Step 3: Review payment details. For payment batch approval, click “View All” to see the details of the batch criteria


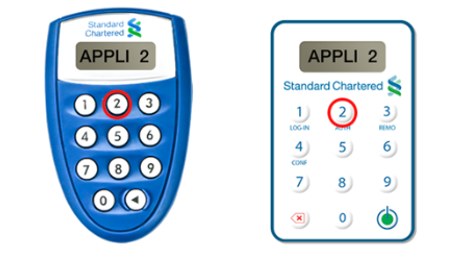
Step 4: When ready to approve, turn on the Vasco token and enter your pin. Upon success, the screen will display APPLI_. Press “2” for transaction authorization, and then press the enter button
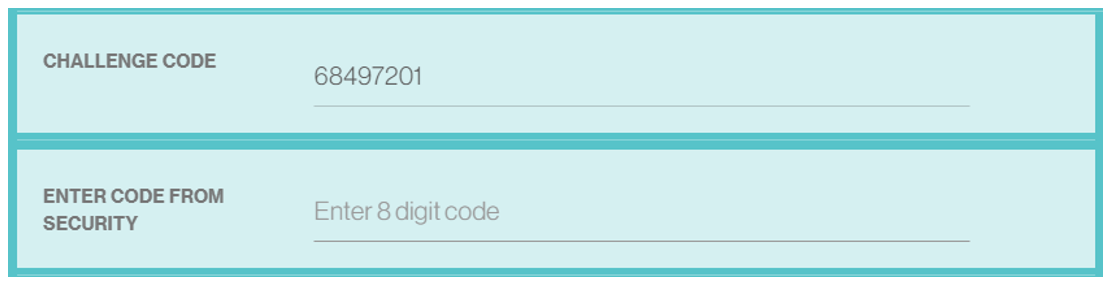
Step 5: Input the challenge code shown on Straight2Bank into the Vasco token and then enter the corresponding response code from the Vasco token into the Straight2Bank page
Step 6: Click “Approve” to release to bank

Multi-select Option: Click “Approve” to release to bank
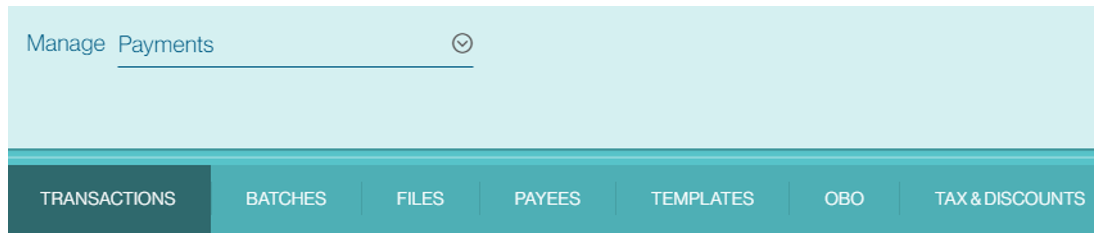
Manage Payments
All your payments can be accessed and managed here:
- Retrieve and continue with the drafts that you previously saved
- Repair a payment batch that has errors
- Release a fully authorized batch to bank for processing
- Track and view batch/transaction details and status
- Print/export the mandate details
- Create payment template based on historical payments data
Step 1: Select Menu -> Cash -> Manage -> Transactions
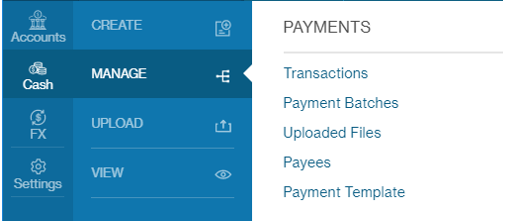
Step 2: Manage your payments by transaction, batch or file level. You can also manage your payees and payment templates
Step 2a: Manage payments at transaction level

Step 2b: Manage payments at batch level (“Batching” is an optional feature on Straight2Bank to provide convenience to clients during the payment authorization workflow)

| List of possible actions | |
|---|---|
| Print the records which are selected in pdf | |
| EXPORT | Export the list in xls/csv/pdf format |
| VIEW | Click on the Payee Name for details |
| DELETE | Delete the payment batch |
| EDIT | Edit the payment batch |
| ALERT APPROVER | Alert approver as a notification |
| MARK/ UNMARK FAVOURATE | Payee would be starred |
| INITIATE PAYMENT | Only for approved payee |
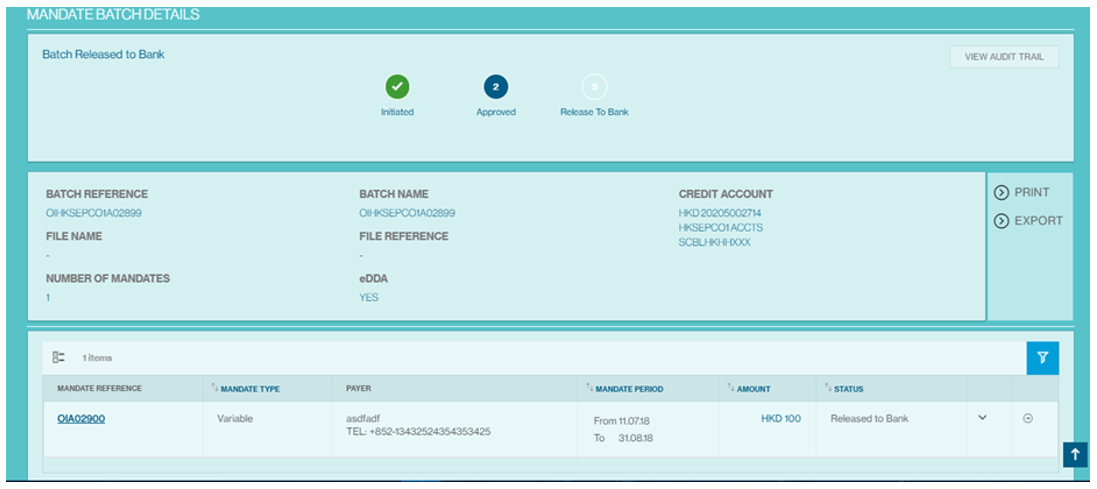
Create Direct Debit Mandates Batch
Step 1: Select Cash -> Create -> Collections -> Direct Debit Mandates
Step 2: Enter batch name. This is defaulted to a system-generated unique batch reference, but client can provide their own reference.

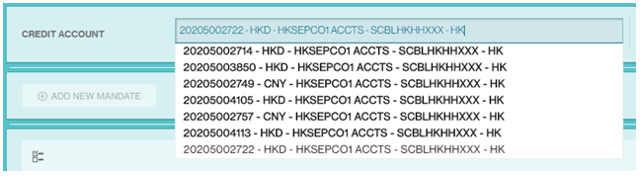
Step 3: Search and select the credit account. Tip: Type at least 3 characters – account number, currency, account name or bank code – to search
Step 4: Indicate whether the mandate batch is an eDDA batch

Step 5: Click "Add New Mandate" to add a mandate to the batch. User can create the mandate either by filling up all details, or copying from an existing mandate and modifying from there.

Step 6: To copy from an existing mandate, search a mandate by typing mandate reference, payer name, payer account or payer bank.

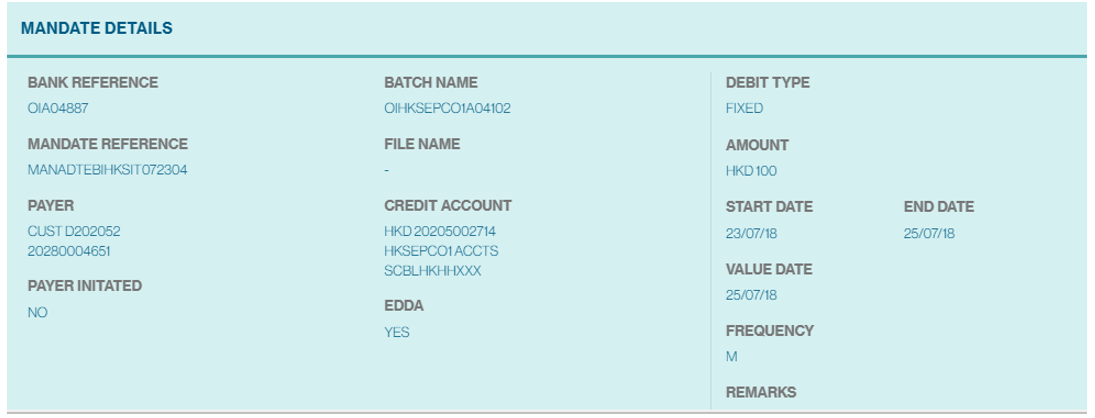
Step 7: Enter Mandate Reference. This is defaulted to a system-generated unique mandate reference, but client can provide their own reference. This needs to be unique within the client group

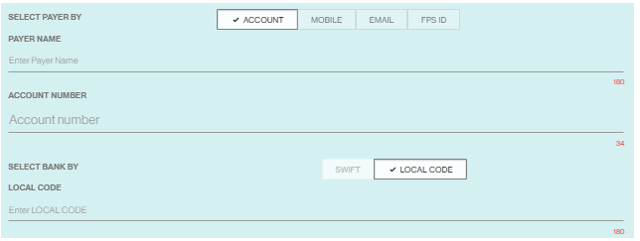
Step 8: Select the payer identifier type and enter the respective payer identifier value. For direct debit from payer account, search and select the payer bank
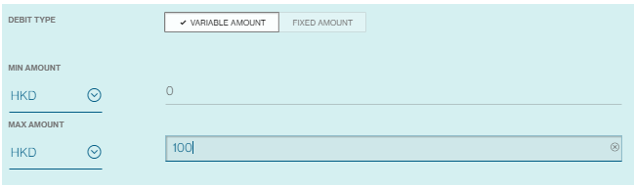
Step 9: Select debit type and fill in remaining mandate details. Direct debit limit can be set as a fixed amount or variable amount, where payment can range from zero to the max amount set by the user.
Step 10: Enter the mandate validity period by providing the start date and end date. (Both are compulsory fields)

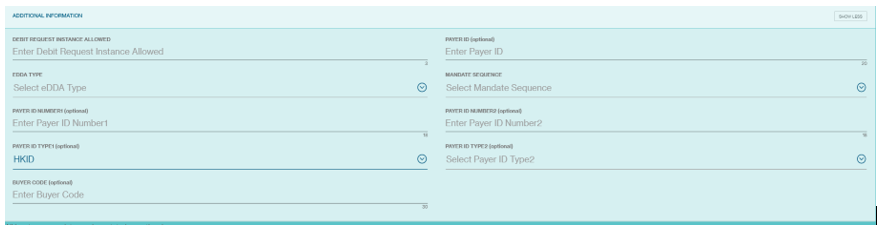
Step 11: For eDDA mandate, it is mandatory to select eDDA type
DDMU – Unconfirmed electronic mandate requiring confirmation by the debtor/payer
DDMP – Paper based mandate, supported by paper authorization form signed by debtor

Step 12: Select Mandate Sequence (RCUR: Recurring; OOFF: One off)

Step 13: Provide any additional information as required. Payer ID Number1 and Payer ID Type1 are mandatory for creating eDDA setup request.
Step 14: Click “Save” to save the mandate and go back to the mandate batch screen. Or click "Save & Add Another" to add one more mandate to the batch

Step 15: Saved mandates would be listed in the batch
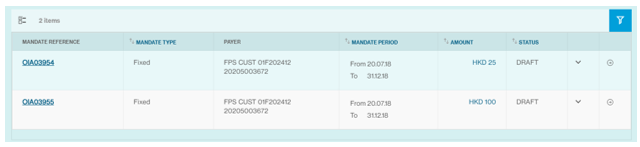
Step 15a: Click "Submit" to submit the mandate batch for approval. Or Click "Save & Close" to save the mandate batch as draft.

Step 16: Review the mandate batch and click “Submit”
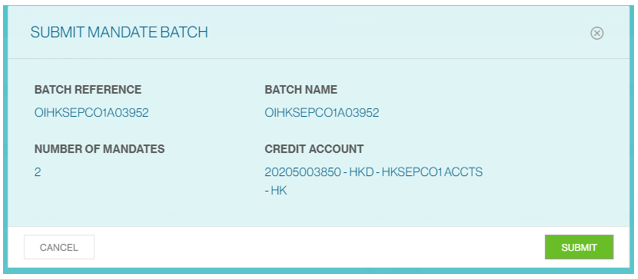
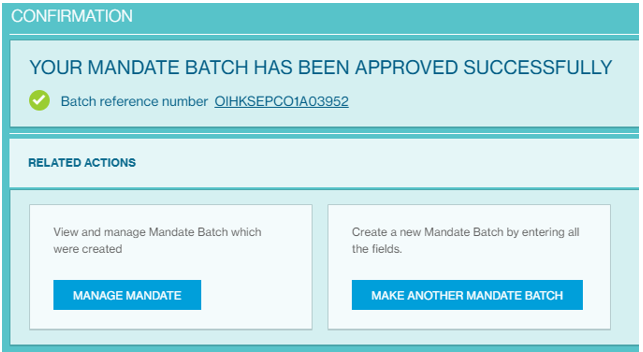
Step 17: Batch submitted for approval depending on the approval set up and can be viewed under “Manage Mandate”
Manage Direct Debit Mandates
All your direct debit mandates can be accessed and managed here:
- Retrieve and continue with the drafts that you previously saved
- Repair a mandate batch that has errors
- Release a fully authorized batch to bank for processing
- Track and view batch/transaction details and status
- Print/export the mandate details
- Amend/cancel an active mandate
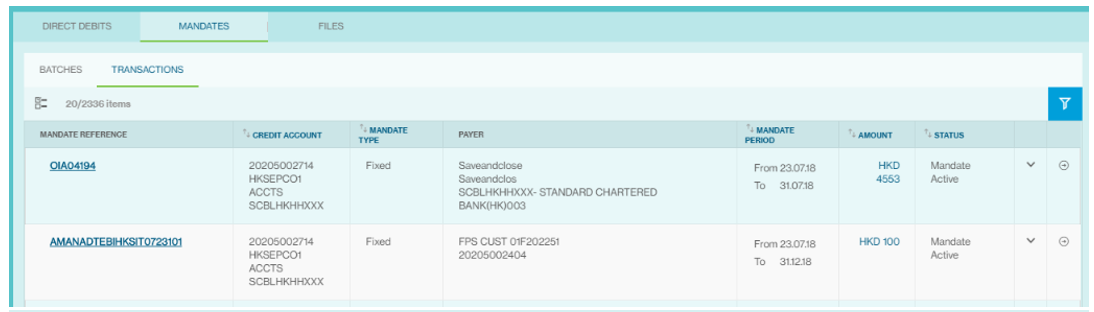
Step 1: Select Cash -> Manage -> Collections -> Direct Debit Mandates
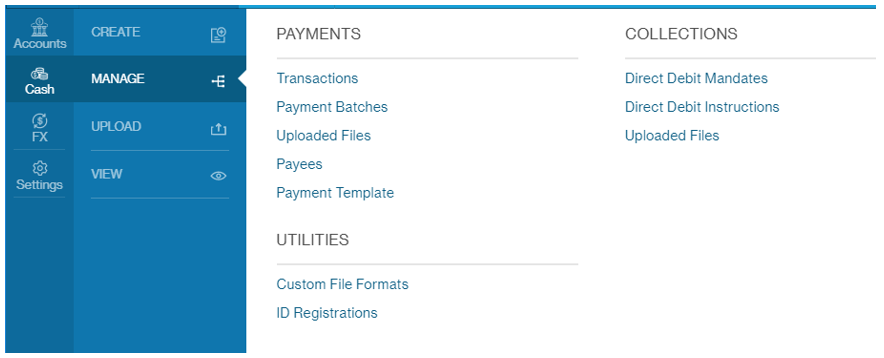
Step 2: To manage your mandate by batch or transaction level, select Cash -> Manage -> Collections -> Direct Debit Mandates -> Batches/Transactions
Manage by batch level, click on the batch reference to view batch details
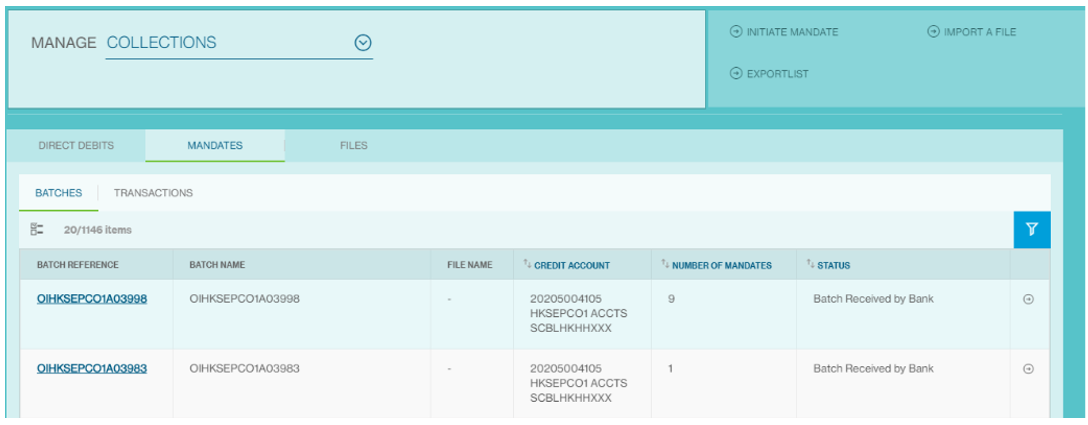
Manage by transaction level, click on the mandate reference to view mandate details
Step 3: To take actions on a mandate batch/transaction, click the button and select the action you want to take. Multiple records can be selected to perform the same action
| List of possible actions | |
|---|---|
| Print the records which are selected in pdf | |
| EXPORT | Export the list in xls/csv/pdf format |
| VIEW | Click on the Payee Name for details |
| DELETE | Delete the payment batch |
| EDIT | Edit the payment batch |
| SUBMIT | Submit Mandate Batch for approval |
| ALERT APPROVER | Alert approver as a notification |
| REPAIR | Repair the Mandate Batch |
| RELEASE TO BANK | Send the mandate batch for Bank Processing |
| AMEND | Amend/modify an active mandate |
| CANCEL | Cancel/terminate an active mandate |
Create Direct Debit Instruction
Step 1: Select Cash -> Create -> Collections -> Direct Debit Instructions
Step 2: Enter BATCH NAME. This is defaulted to a system-generated unique batch reference, but client can provide their own reference.

Step 3: Search and select the credit account. Tip: Type at least 3 characters – account number, currency, account name or bank code – to search.

Step 4: Select YES.

Step 5: Click ‘ADD DIRECT DEBIT’ to add a Direct Debit instruction.

Step 6: To copy from a previous DIRECT DEBIT, click this field and select the relevant option

Step 7: Your Reference is system generated.

Step 8: Enter an existing active Mandate Reference. Then related payer information will auto retrieved.

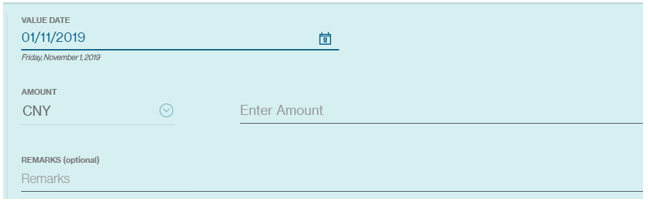
Step 9: Enter Value date & Amount
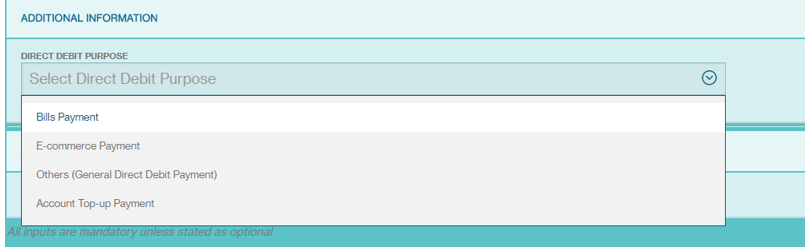
Step 10: Select Direct Debit Purpose from dropdown list.
Step 11: Click Save to submit the DDI.
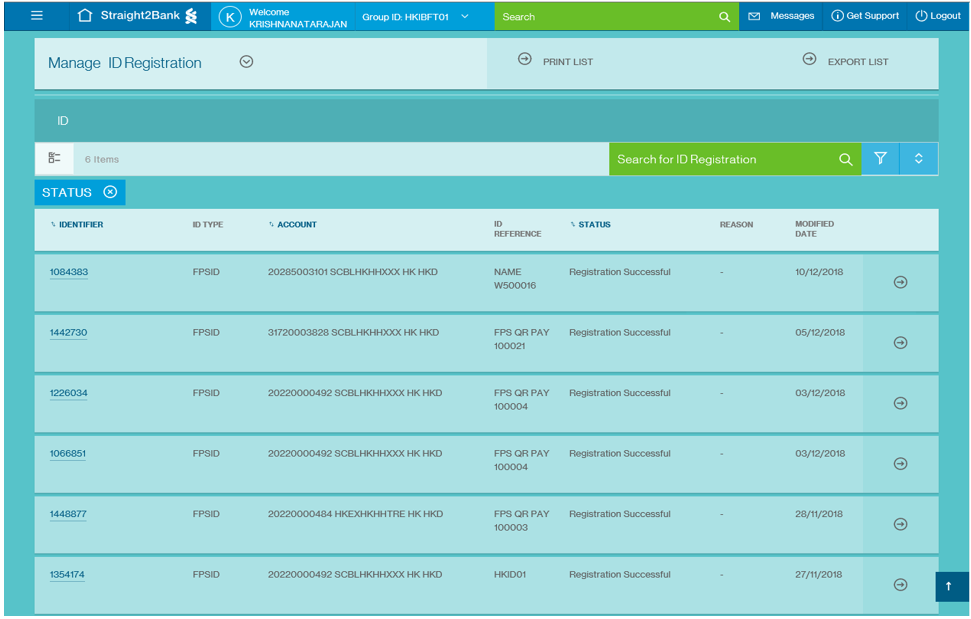
FPS ID registration
Step 1: Select Cash -> Create -> Utilities -> ID Registrations
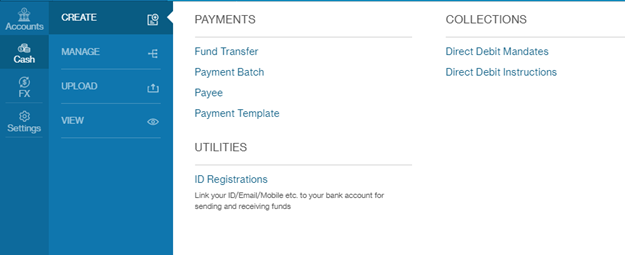
Step 2: The ‘HK-FPSID' Type will be displayed to user if they are assigned with HK accounts.
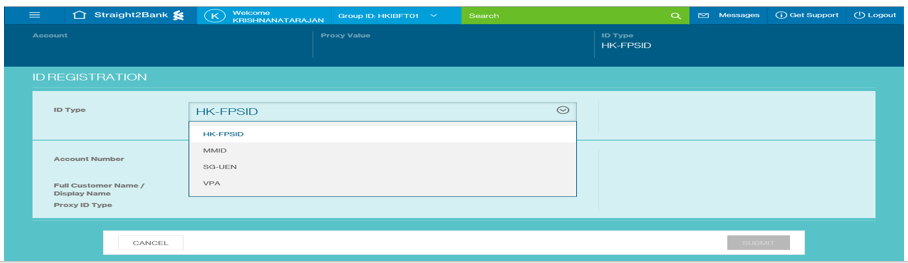
Step 3: Once user selects the ID Type, the account lookup will be enabled where user can choose the account against which the FPS ID is to be registered. Only HKD or CNY accounts can be registered. The accounts will be listed to user based on FAP (function entitlement) and DAP (account entitlement) for ID registration
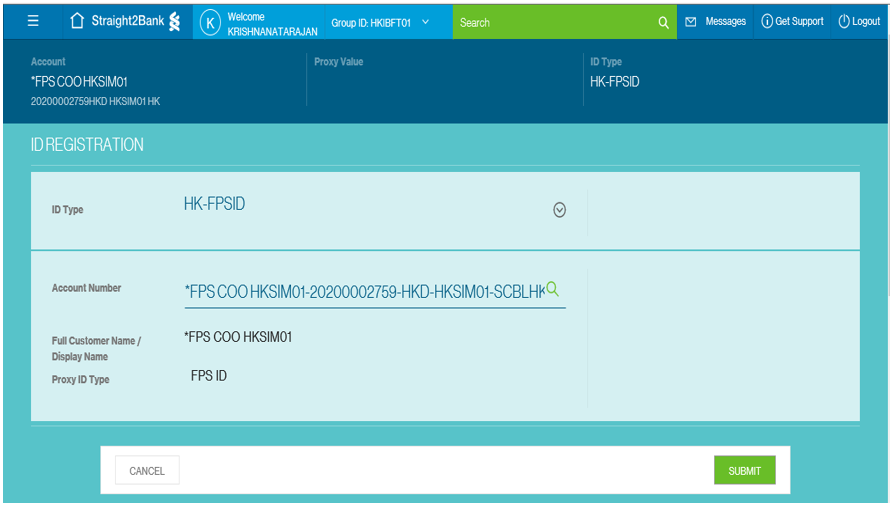
Step 4: When the record is successfully submitted, a message 'Record submitted for approval' will be displayed. The record will be submitted for approval with status 'Registration Pending Approval'
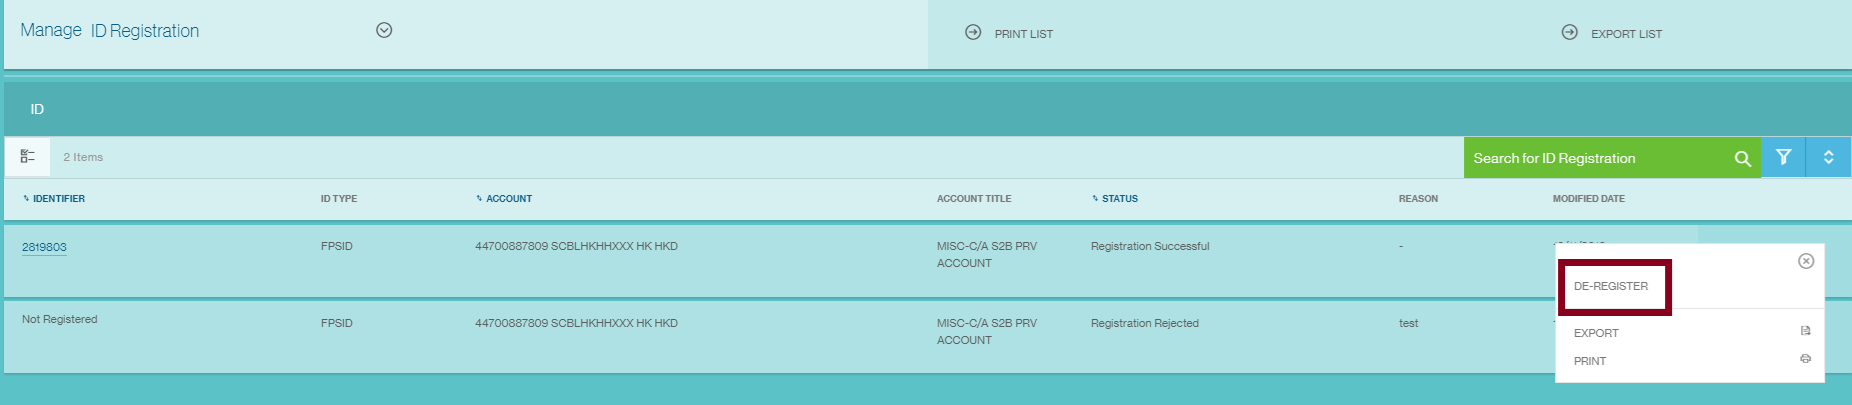
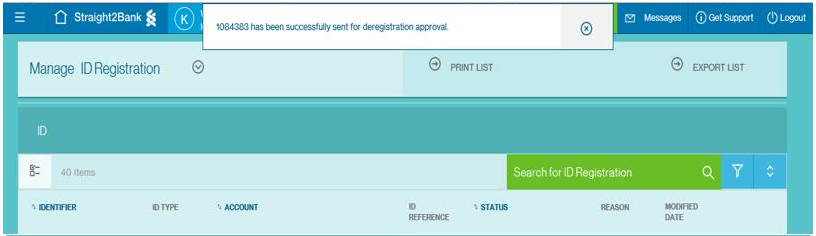
FPS ID De-registration
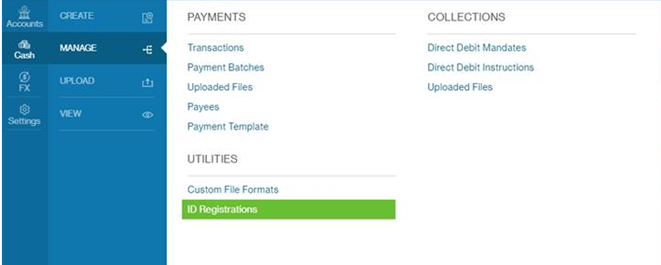
Step 1: Select Cash -> Manage -> Utilities -> ID Registrations
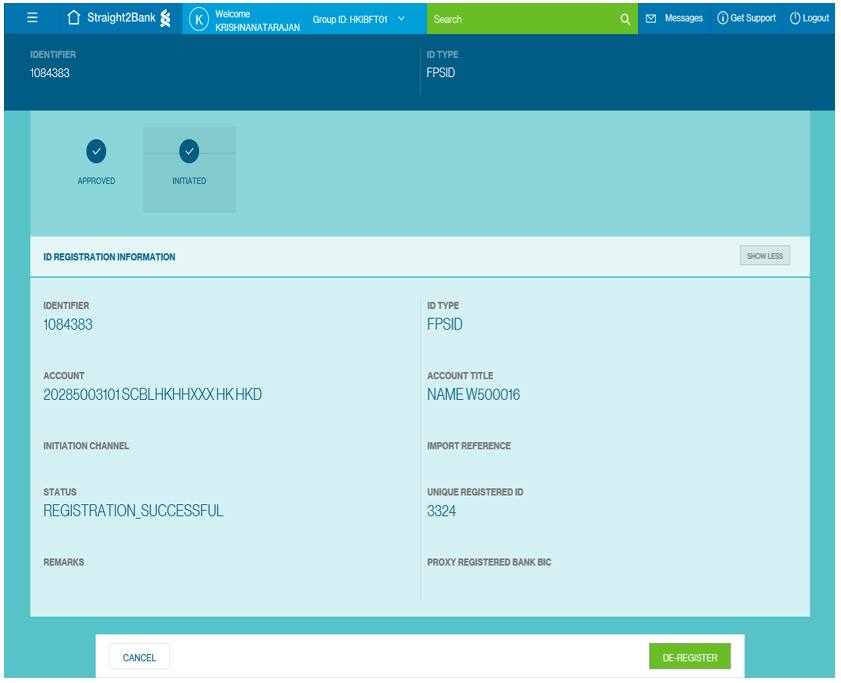
Step 2: De-registration will be allowed only for records with status ‘Registration Successful’. Identifier (FPS ID) will be a hyperlink and user will be able to click each FPS ID record
Step 3: User can choose a record to de-register by clicking the 'De-register' option in more options from summary screen/’De-register’ button in detail screen
Step 4: User can enter comments for de-registration
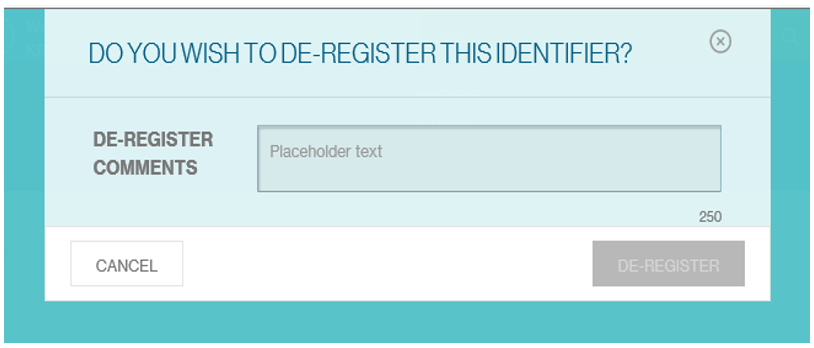
Step 5: Once user clicks on de-register, the record will be submitted for approval with status 'De-Registration Pending Approval'
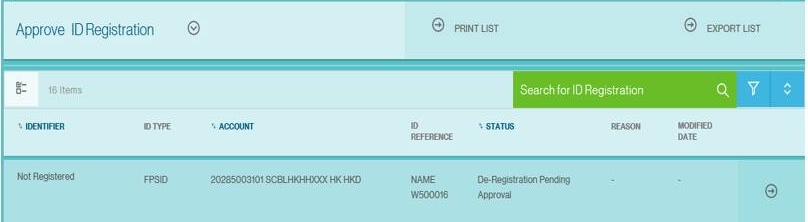
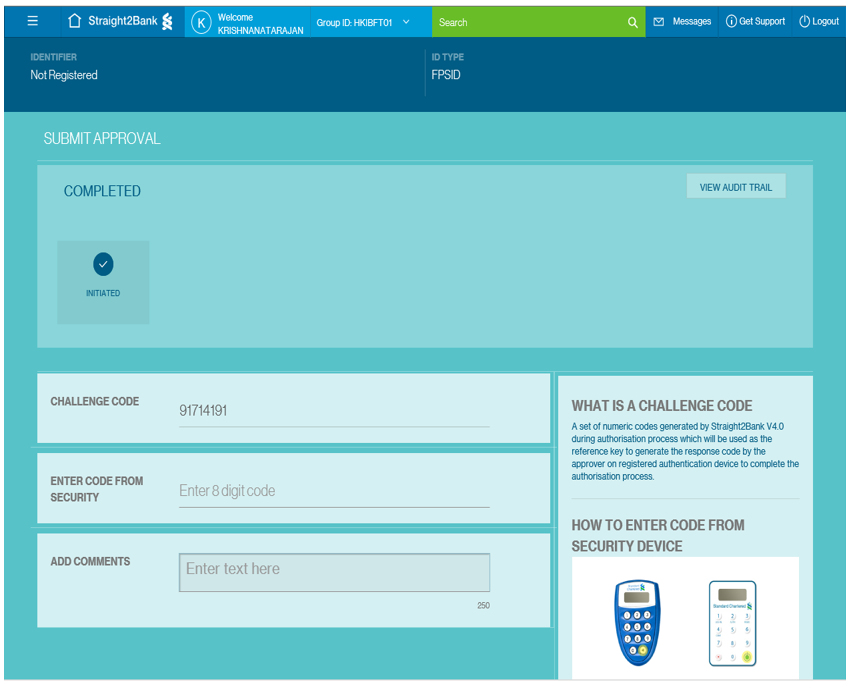
Approve/Reject ID registration
User may single or multi-select records to approve. When clicking on "Approve", user will be asked to complete the Vasco authorisation with comments for the approval action
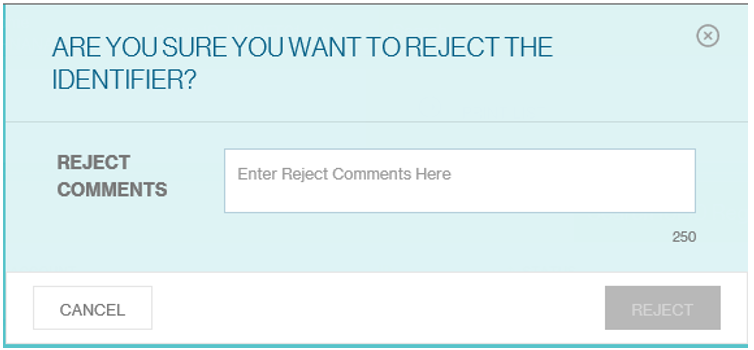
User can reject only one record at a time. User will be asked to capture the Reject Comments on the screen
Frequently Asked Questions (FAQ) on FPS
FAQ on FPS – General
1. What is FPS?
FPS stands for Faster Payment System, an initiative introduced by HKMA to facilitate real-time 24/7 payments between licensed banks and stored value facilities (i.e. mobile wallets like Alipay, WeChat, O!ePay).
2. What currencies do FPS support?
Currently FPS supports HKD and RMB
3. What is the transaction limit for FPS payments?
FPS transaction limit varies by bank. Standard Chartered offering is 1 million for both HKD and RMB. Limit applies to out-going FPS transactions only. Please contact your relationship manager/client services team for daily transaction limits.
4. What are the differences between FPS, RTGS and ACH?
| Payment Systems | FPS | ACH | RTGS |
|---|---|---|---|
| Channel options | Usually internet and mobile banking | Usually internet banking only | Usually internet and mobile banking |
| Availability | 24x7 | Bank business day and cut-off time | Bank business day and cut-off time |
| Transaction limit | Varies by Bank | No cap | No cap |
| Funds receipt / visibility (payee) | Almost immediately | 2 to 3 business days | Same day to 1 business day |
| Payer’s liquidity requirement | Intraday may increase | Per current practice | Per current practice |
| Transaction cost | Between RTGS & ACH(Varies by banks) | Cheaper than RTGS | Relatively more expensive |
5. Will FPS replace CHATS/RTGS?
FPS and CHATS are two different payment types with distinct propositions including cut-off times, supporting currencies and transaction limits. According to HKICL, the back-end infrastructure for these two payment types will be merged in 2021.
6. What is the pricing for FPS?
Standard pricing for FPS is published in download centre site :
https://www.sc.com/hk/help/download-centre/
https://www.sc.com/hk/zh/help/download-centre/
For any further enquiries, please contact your Relationship Manager
7. In short, what do we need to do to benefit from FPS?
Since all FPS features are built on Straight2Bank NextGen, clients who would like to make outgoing payments or electronic direct debit authorization (eDDA) and Real-time Direct Debit (RT-DDI) must be onboarded or migrated to the platform to enjoy the FPS related services.
If clients are only receiving credits, then migration to Straight2Bank NextGen is not required. All corporate, commercial and business clients can receive incoming credits via FPS. Reporting of incoming FPS activities will be made available via existing Straight2Bank reporting channels.
FAQ on FPS – Credit Transfer
1. What is credit transfer (CT)?
It is one of the major functions under FPS to facilitate P2P, P2B and B2B funds transfer in a timely manner. The payment instruction can be submitted in real-time or batch mode
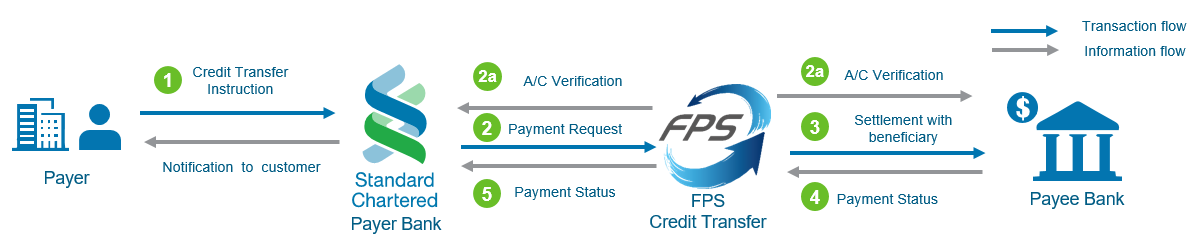
2. Is instant credit transfer really real-time?
It depends on the Payee Bank and whether they support real-time receipt or batch receipt.
3. I heard that beneficiaries’ account numbers are not necessary when making payment using FPS, is that true?
Yes, with the addressing service that Standard Chartered has subscribed to, payer can enter the proxy ID of the beneficiary (mobile phone number, or FPS ID) to identify the beneficiary instead of typing the entire bank account number.
4. Will the beneficiary receive payee advice after the credit transfer is initiated?
Payee advice is not sent for credit transfer under FPS as the beneficiary receives the funds instantly or near real-time and alert notifications are available on beneficiary bank side
5. Can I make future dated credit transfer using FPS?
No. Future dated credit transfer is not supported under FPS credit transfer. If future date is selected on the Straight2Bank payment page, IBFT payment type (i.e. FPS credit transfer) will not be shown as an option.
6. What if I make a credit transfer to a wrong beneficiary? Can I initiate the payment refund?
If both payer and payee banks support real-time mode, account verification will be done real-time when the credit transfer instruction is made. If the information is invalid or incorrect (e.g. invalid account number or proxy ID), transactions would be rejected upon initiation. Refunds will not be applicable.
FAQ on FPS – Electronic Direct Debit Authorization & Real-time Direct Debit
1. What is the Standard Chartered FPS capability on collections side?
Standard Chartered subscribes all core and optional services for collections including:
- Electronic direct debit authorization (e-DDA),
- Direct debit mandate setup and maintenance, and
- Real time direct debit initiation.
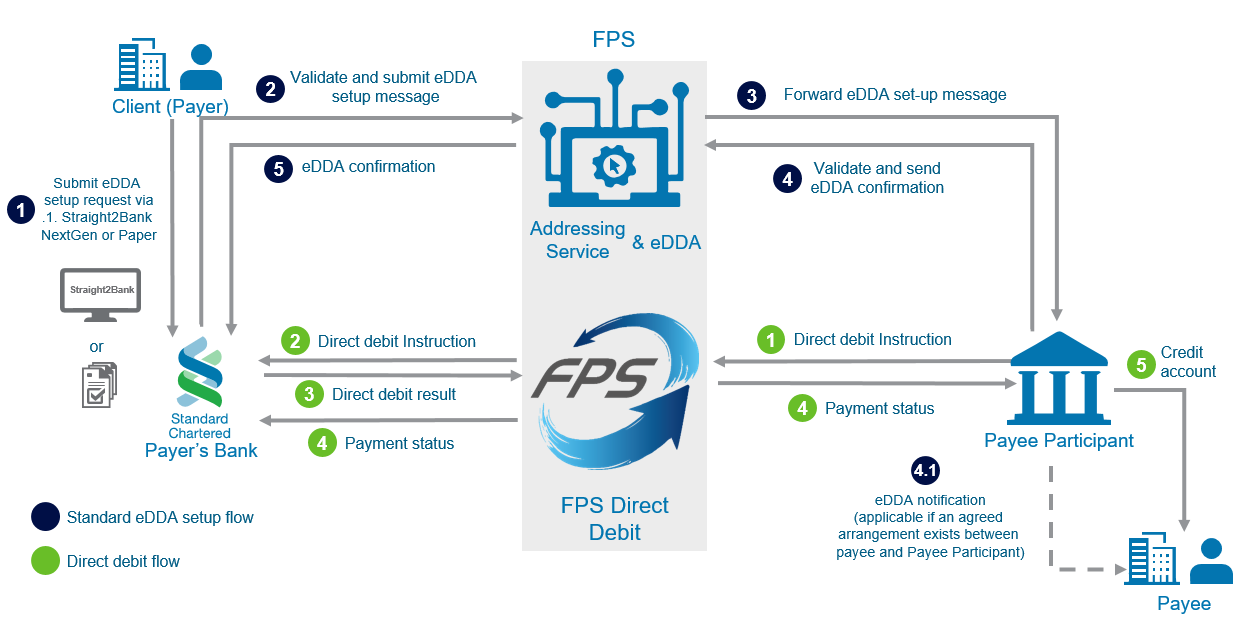
2. What is something new about direct debit authorization?
The eDDA Module in FPS provides a new direct debit authorization exchange feature enabling Participants to exchange eDDA messages/files for setup, amendment and cancellation of direct debit authorization in real-time or batch mode.
The eDDA Service supports both standard direct debit authorization model (i.e. eDDA setup initiated by Payer Participants) and simplified direct debit authorization model (i.e. eDDA setup initiated by Payee Participants). There are three types of eDDA mandates:
| Mandate Type | Standard eDDA | Simplified eDDA | Description & remarks |
|---|---|---|---|
| Confirmed electronic mandate (DDMC) | ✔ |
|
|
| Unconfirmed electronic mandate (DDMU) | ✔ |
|
|
| Paper based mandate (DDMP) | ✔ | ✔ |
|
Together with the Addressing Service that Standard Chartered has subscribed to, the eDDA maker can enter the proxy ID instead of entering the normal bank account number to identify the payer (for simplified eDDA) or the payee (for standard eDDA)
3. What is the end-to-end flow of a direct debit from making a mandate to making an instruction?
For standard eDDA set up (payer initiated):
- Paper Based Mandate (DDMP) – payer submits eDDA setup request through paper form
- Confirmed Electronic Mandate (DDMC) – payer submits eDDA setup request through Straight2Bank NextGen
For simplified eDDA set up (payee initiated):
- Unconfirmed Electronic Mandate (DDMU)* – payee submits eDDA setup request through Straight2Bank NextGen or other electronic channels
- Paper Based Mandate (DDMP) – payee submits eDDA setup request through Straight2Bank NextGen or other electronic channels
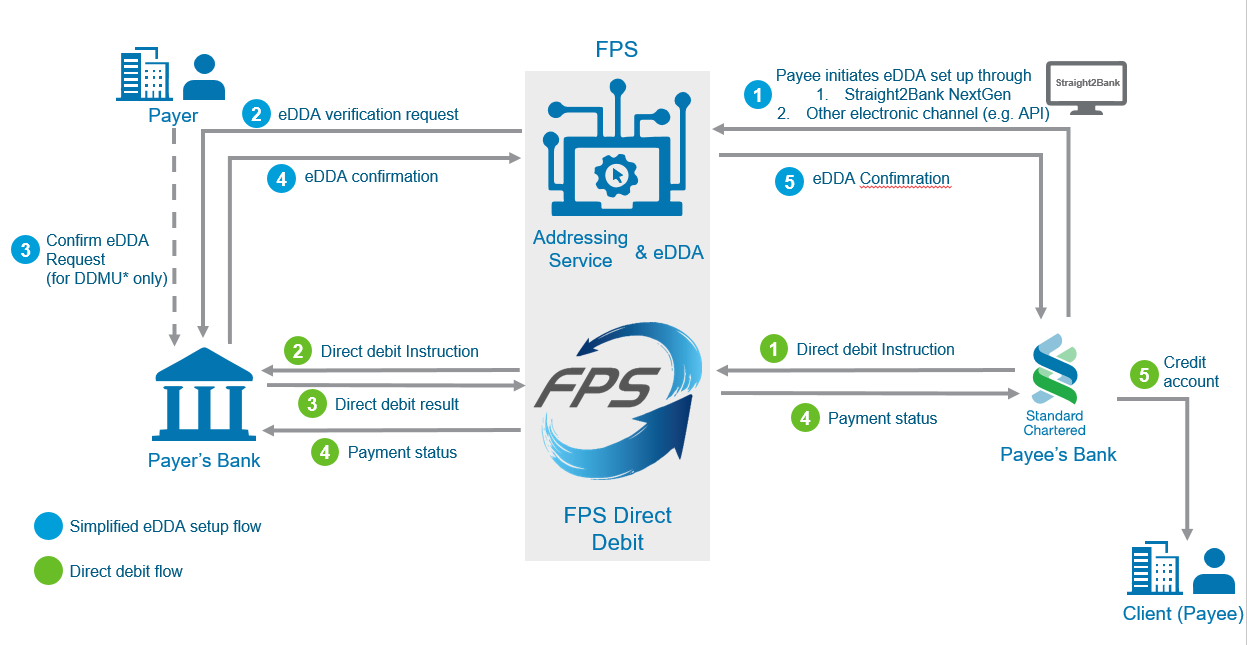
*DDMU is an optional mandate mode provided by HKICL which is not supported by all banks in the market today
4. I am setting up an eDDA as a payee, will Standard Chartered do any validation on the payer’s proxy ID input?
Standard Chartered will go to the FPS Addressing Database to resolve the Proxy ID during e-DDA setup process. When the proxy is resolved, a masked name (e.g. CXXX TXX MXX) for a retail client or full name for a merchant will be displayed.
Please note that when an individual or a merchant is registering a proxy ID on a bank’s channel, it is the bank’s responsibility to do verification. So the proxy ID should belong to the genuine payer upon registration.
With proper validation at e-DDA Proxy ID registration and consumption, the actual payer can be identified. The subsequent DDI actual payer can thus be ascertained.
5. Besides eDDA Creation, what functions does Standard Chartered support?
Standard Chartered expands on supported function types – eDDA Amendment and Cancellation in addition to Creation
6. For Real time DDI under FPS, will the incoming credit be posted as one single entry or line by line?
It will be line-by-line posting like incoming credit, which is different from the prevailing DDI workflow (lumpsum credit posting on collected amount and return/reject items on next day).
FAQ on FPS – Addressing Service & Proxy ID
1. What is Addressing Service?
The Addressing Service is one of the overlay services of FPS that provides a centralized repository of addressing records accessible by all FPS Participants subscribing the service. The aim is to facilitate customer to specify the bank/SVF account using identifiers such as mobile phone number, email address or FPS identifier (FPS ID). These identifiers are collectively known as proxy identifiers (Proxy ID) .
2. What is a proxy ID?
FPS supports proxy identifier (Proxy ID) such as mobile phone number, email address or FPS ID (an identifier assigned by FPS upon registration) for account identification in addition to the conventional way of using bank account number.
3. Is Proxy ID mandatory for FPS transactions?
You can make FPS payment to a Proxy ID or an account number. If you choose to use your email address, mobile phone number, or FPS ID for receiving FPS payments, proxy registration is required for account identification. You can also choose to use your Standard Chartered account number for receiving FPS payments, and proxy registration is not required.
4. How can Standard Chartered clients benefit from using proxy ID?
For payments, when you are initiating real time credit transfer (IBFT), if the beneficiary has a proxy ID (mobile phone number or FPS ID), then instead of typing the beneficiary’s bank account number, now you just need to type in the proxy ID and the beneficiary information can be identified through the addressing service under FPS. The same applies when other parties are paying to you.
For collections, when you are setting up electronic direct debit authorization online, you just need to type in the proxy ID of the payer (under simplified e-DDA) or payee (under standard e-DDA). Again no bank account number is needed.
5. What proxy ID can Standard Chartered clients register with the Bank?
Our corporate, institutional and commercial banking clients can register their unique FPS ID with Standard Chartered
6. What is FPS ID and how can Standard Chartered clients register a FPS ID with the Bank?
FPS ID is a unique random number generated by the FPS system. One FPS ID can only be associated to one bank account.
Customers can register FPS ID using Straight2Bank, together with FPS ID amendment and cancellation
7. What types of Standard Chartered accounts can I link my FPS ID to?
You can register Proxy ID with your HKD / RMB Current and Savings Account with Standard Chartered.
8. Can I link the same FPS ID to accounts with different banks?
No, each FPS ID is restricted to one account of one bank only.
FAQ on FPS – QR Code Solutions
1. What is FPS QR code?
To facilitate the acceptance of electronic payments, HKICL has published The Common QR Code Specification for Retail Payments in Hong Kong for merchants to create QR codes (under EMV standard) that support receiving FPS payments. For P2M payments, merchants can display the FPS QR code on physical invoice, mobile POS device, website or other online channels and allow the payers to scan the QR code to make FPS payments.
2. How can I generate QR codes for receiving FPS payments?
Please refer to HKICL for details on the QR code specifications:
https://fps.hkicl.com.hk/eng/fps/merchants/qr_code.php
Please contact your Relationship Manager for further discussion if you would like to explore how FPS QR code solutions can benefit your business.
3. What is a typical user journey for a QR code payment (P2M) through FPS?
- Merchant presents Static or Dynamic QR to the payer either via electronic display or hard-copy printed material
- Payer logs in to his/her Bank's Retail-Banking-App and scans the QR code.
- Retail Bank's App reads the data from QR and reaches HKICL (addressing service) to resolve the Proxy.
- Retail Bank's App then initiates FPS payment to send the fund to Merchant Account in real-time.
4. How is merchant client notified of the payment status for QR code payments?
Merchant client for P2M payments will need to approach payment operator/payee participant in FPS. Static/dynamic QR code payment details will be in Straight2Bank reports.